

Launched in April 2015, Skype for Business is the business version of the popularly used chat application, Skype. This telecommunications software was once known as Microsoft Lync Server (because it is a combination of Lync and Skype), and uses text chat, voice calls and online meetings to communicate with people.
At the click of a button, you can make voice or video calls, share files, perform web conferencing, send emails, open text chats and start online meetings with people from around the world, provided they have a good internet connection. Skype For Business is Software as a Service offering and comes under Microsoft 365. If you want to configure it as a stand-alone product, that's also possible. It is also called S4B, SFB, SfB or Skype4B in short.
The software can be deployed as on-premise, hybrid or on the cloud. It can run on Android devices, Windows operating systems and Apple iOS devices. The best features for Skype4B include:
- High definition video and audio conferencing for up to 250 people
- Topic based discussion sessions remain intact even after the users leave
- You can schedule meeting via Web Scheduler and Outlook
- Easy broadcast to over 10,000 attendees
- You can record different aspects of the meeting for future
Why Skype for Business is so Trendy in the Market
SFB is very easy to integrate with other apps. With serverless computing you can integrate all the platforms easily, especially integrating email with Dynamics and Skype with email under a single suite.
It also offers the possibility to invite third parties into the meetings, including people who are actually outside the network, even if they don't have an email account. Once the participants are registered in their company's domain, they can join in for meetings within the S4B platform.
With the ban of chat applications in some Middle Eastern countries, business enterprises in other countries were unable to interact with their partners and stakeholders in those countries. They couldn't hold meetings or discussions regarding their business as they would have liked. With Skype4B, this has been solved. Collaboration with partners and stakeholders can be done by inviting third parties. A single account with Microsoft would give them the opportunity to continue their interaction seamlessly and fruitfully.
Skype for Business Requisites
Before we look at the process of integrating Skype for business into an application, certain pre-requisites need to be in place.
1. Office 365 Tenant - It is imperative to have an Office 365 for SFB tenant with a user who has been assigned a Skype for Business license.
You can choose a subscription-based model depending on the number of users you are planning to add. However, it is essential for at least one user to have access to Skype For Business.
2. Azure Active Directory - Set up a tenant in Azure Active Directory, if not already done. Open the Admin Center section of the Office 365 Admin Portal to get to the Azure portal.
3. Web Server - A web server is required to host the app since Skype Web SDK is for a web application. Azure Web Apps is a viable option.
4. Any editor for coding JavaScript and HTML.
Trusted Application API
The Trusted Application API is a Rest API that meets the demand to build powerful, back-end features with Skype for Business Online in the cloud. It is essentially an extensible Skype for Business Online Cloud.
The API makes things easier for the developer, akin to Skype for Business Server's Unified Communications Managed API (UCMA) in the cloud. This API makes it possible to have a cloud-first approach. It also provides, a number of powerful features that are not available on on-premises Skype for Business Server customers through UCMA.
It makes scaling easier, helps reduce operational costs and leads to very low security risks (from untrusted tenants and applications) as communication resources and tenant/domain-specific application data are separated.
The Trusted Application API lets developers write Skype for Business Online applications that act as a service endpoint without requiring a user context or identity. The most common use cases are apps that schedule and manage on-demand meetings (Example: a contact center application), those that create on-demand customer service calls and add customer service reps to the meetings, voice-based call answering services and routing bots.
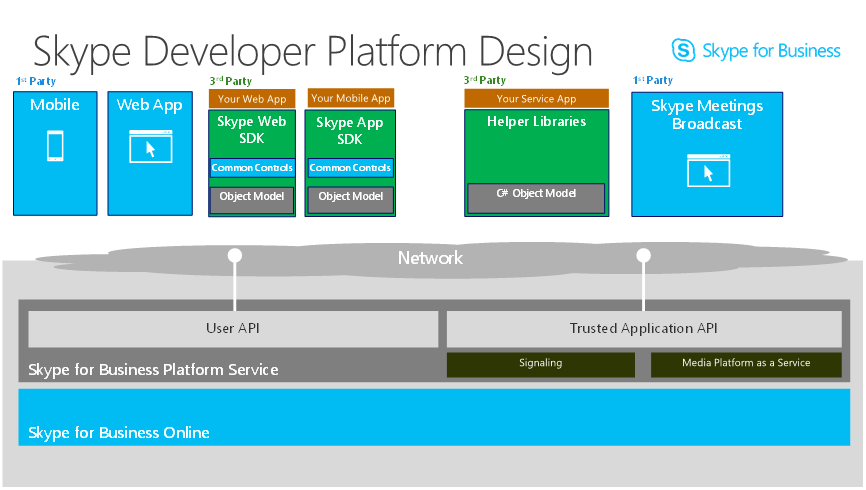
Image Credit: Microsoft
This diagram clearly shows how the Trusted Application API is placed as the middle-tier SaaS component in Skype For Business Online. A 3rd party service app provides simple RESTful interface between a mobile client and the Trusted Application endpoint.
Example: Service App helper method handles authentication token fetching and discovery services for a mobile client. Trusted Application APIs can be called upon to create new meetings and return meeting join URLs to mobile clients that will join the meetings.
Integration of Skype for Business into Applications
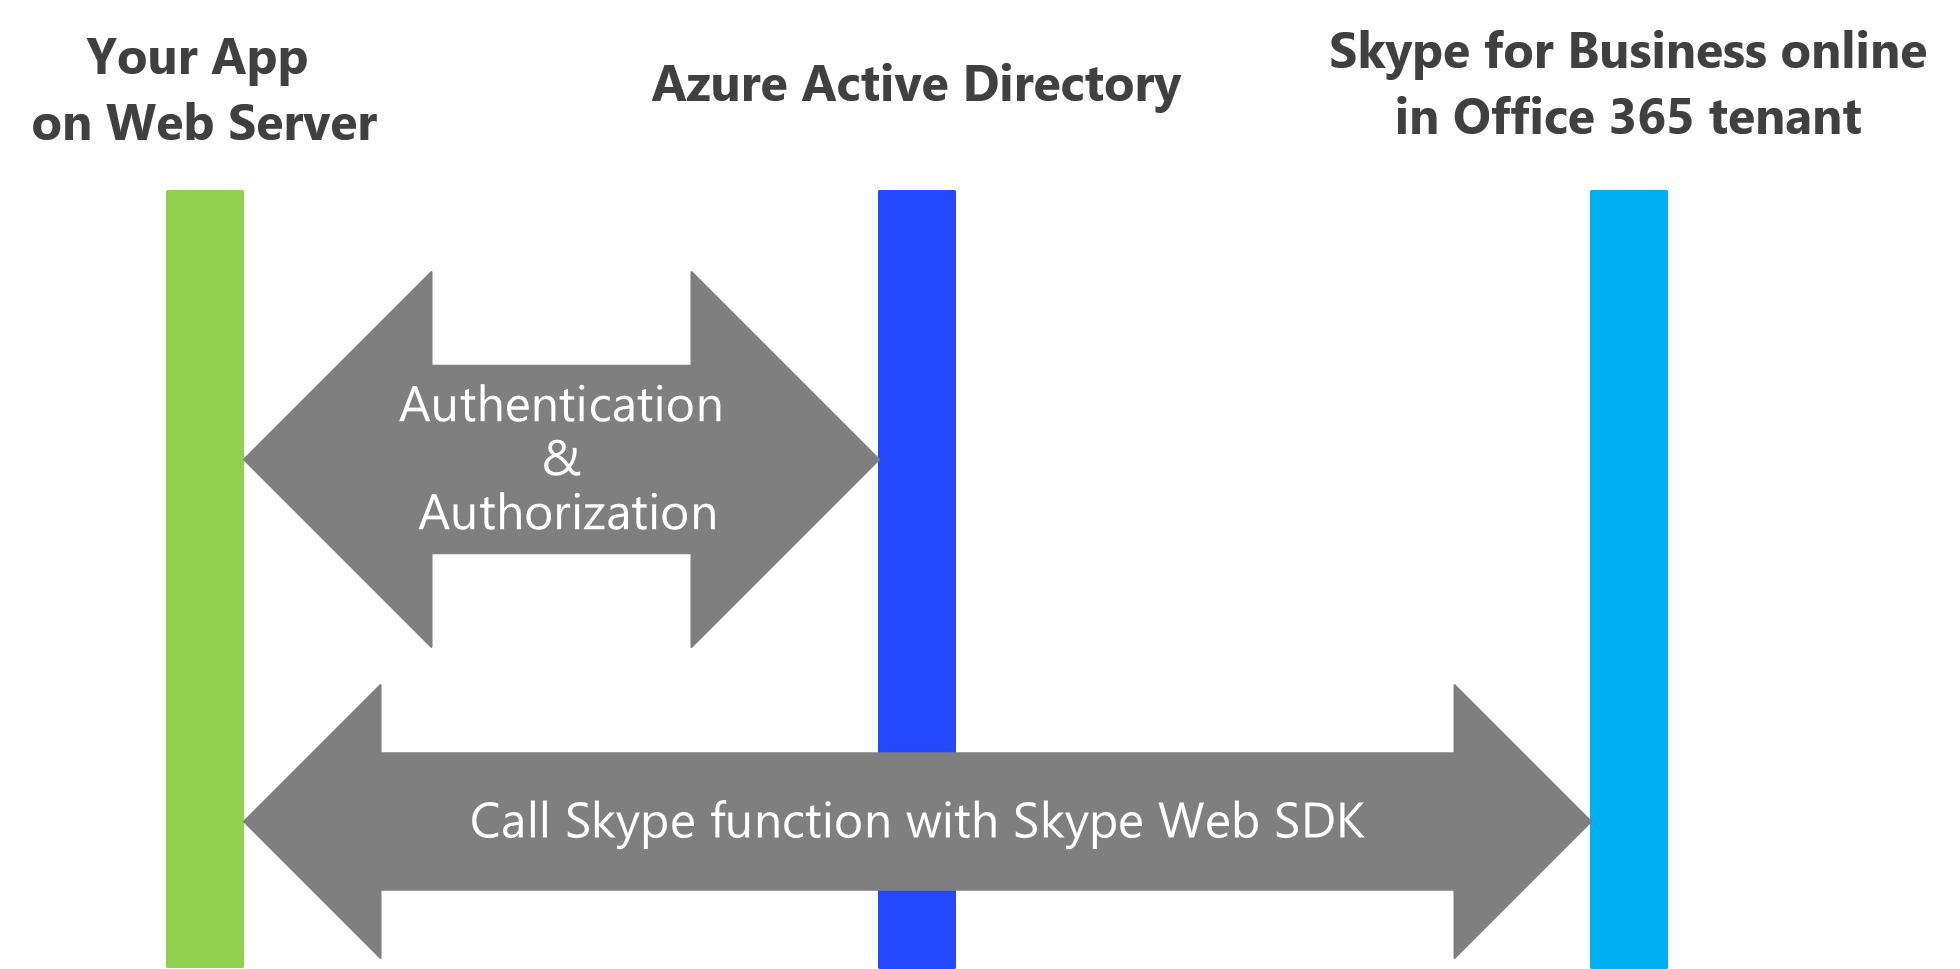
Image Credit: GitHub
Step 1: Register the Application in Microsoft Azure Active Directory
Click on the quick registration tool to register Skype for Business Trusted Applications in Azure and Skype for Business Online. This way, you don't have to register your application separately in Azure portal. You can also set the identification and the permissions it requires.
In case, you'd prefer to do a manual registration in Azure Active Directory, the following steps can be done with Microsoft Office 365 user privileges.
1. Login to Microsoft Azure with your Microsoft Office 365 user ID and password. Microsoft Azure window comes to display.
2. In the Microsoft Azure portal, move to: Azure Active Directory> App Registrations> New Application Registration.
3. Set the application name in the Name field.
4. Set the Application Type to Web app/API. This will be set by default.
5. Specify your application's URL in Sign-on URL.
6. Click Create. Now, the app is registered and displayed in the list of applications in the App Registrations window. Following this, an Application ID is generated.
The required permissions must be enabled in Skype for Business to complete the registration process.
1. Select the application from the App Registrations window.
2. Under the Settings tab, navigate to the API Access section and click Required Permissions.
3. Click Add and Select and API.
4. Choose Skype for Business Online (Microsoft.Lync) API.
5. Click Select Permissions and choose the required permissions
There are essentially two types of permissions you can choose from:
Application Permissions: To access Skype for Business Online on behalf of an application.Delegated Permissions: To access Skype for Business Online through the application as a user.
6. Once the required permissions are selected, click Done.
Step 2: Register the Trusted Application Endpoints
With the help of PowerShell cmdlets, you can register Trusted Endpoints in a Skype for Business Online tenant.
In order to run the admin PowerShell, do the following:
- Download and install the Skype for Business Online Connector module.
- Open Windows PowerShell as Administrator and run the following script.
Import-PSSession (New-CsOnlineSession -Credential (Get-Credential))
Setting up the Trusted Application Endpoints can be done using the following cmdlets.
- New-CsOnlineApplicationEndpoint To create a new application endpoint.
- Get-CsOnlineApplicationEndpoint - To fetch the application endpoints for the tenants.
- Set-CsOnlineApplicationEndpoint To update the application endpoint.
- Remove-CsOnlineApplicationEndpoint To remove the application endpoint.
The cmdlets utilize one or more of the following parameters:
ApplicationId: The Azure ApplicationID/ClientID that was generated during the registration.
Name: A simple name of the application inside Skype for Business Online.
Uri: The unique SIP URI which is used to identify the application's tenant specific endpoint. Requests sent to this endpoint will trigger the Trusted Application API and send an event to the application which indicates that a request has been sent.
Example: A PowerShell cmdlet to create a new application endpoint
New-CsOnlineApplicationEndpoint -Uri "sip:identifier@sample.com" -ApplicationId "12cc763a-5c1f-60da-59fb-g34cj6785354" -Name "DemoApp" -PhoneNumber "18822229898"
Step 3: Provide Consent
If an application is developed as a multi-tenant application, the tenant's admin should consent to it. This ensures that the tenant can use the application.
In order to provide the tenant admin's consent to the application, a consent link can be created. This consent link should have the Client ID and Redirect URI of the application set correctly.
Example:
https://login.windows.net/comm... triggers a page to open up when a tenant admin logs in. The page lists the permission requests from the service application and once it's provided, the application can get Oauth tokens from Azure Active Directory for that particular tenant.
The consent to a particular application can also be revoked by the tenant admin through the AAD Azure Management Portal, or by using the "Remove-MSOLServicePrincipal" cmdlet in Azure AD PowerShell.
Step 4: Authenticate to Obtain Oauth Token
An Oauth token with the application identity from Azure AD is required by all Trusted Application API endpoints. This permits the application to access the Trusted Application API resource.
Since the Trusted Application API accepts only an AAD Oauth token issued to an application identity, the application's credentials (certificate) must be uploaded to Azure Active Directory. Another alternative is to utilize a client secret.
When the Skype for Business Online service asks for authentication, the application should authenticate against Azure Active Directory and receive the Oauth token.
In essence, when a user visits your website and initiates sign-in, your application makes a request to the Microsoft common OAuth2 login endpoint. Azure AD comes back with a sign-in page, where the user signs in. After checking for authentication and authorization of the request, the user will be granted access to SFB Online.
If you want an access token for Skype for Business API requests, the application should use the OAuth implicit grant flow. This will not happen by default. Update the application's manifest to allow the OAuth implicit grant flow and then edit the manifest.
Here are the steps:
1. In the Azure App Registrations window, click on the application.
2. Click on Manifest.
3. In the Edit Manifest text editor, set the "oauth2AllowImplicitFlow" to "true". Note: By default, this value is set to False.
4. Click Save.
5. If you want multiple domain support set the "availableToOtherTenants" to "true".
Step 5: Call the Trusted Application API
There are two categories of Trusted Application scenarios.
1. The service application starts the scenario: The app sends requests to the Skype for Business Platform Service through the Trusted Application API to require a particular capability (Example: to send a direct message)
2. The Skype for Business Online events start the scenario: The Skype for Business Platform Service sends an event to the service application (Example: an incoming direct message). This event indicates that Skype for Business received a request directed to the service application endpoint.
Based on the required scenario, the developer will have to update the code so that it supports Skype for Business Online. To do that, you can update a web page in the app to show the Azure sign in screen. You will also have to make changes in JavaScript to activate Skype Web SDK API entry point.
As the next step, call the signInManager.signIn method on the SDK (either on some button click or automatically).
Step 6: Try it to See How it Works
In order to see whether your Skype for Business works well, you need to have two computers/devices complete with the audio-video facilities and 2 O365 user accounts.
To start with Skype Web SDK development, you can make use of the simple sample code for Skype for Business Online available in GitHub here. Next,
1. Access the web App.
2. Click on [Admin Consent] button to grant your app.
3. Click on [Sign-in O365] button to sign-in with your O365 account.
4. Click on [Initialize SkypeUI] button to "Initialize Skype Web SDK".
5. Click on [Sign-in Skype] button to sign-in Skype.
6. Click on [Start Chat] button to show Chat/Audio/Video window using Conversation Control.
7. Now, to begin chatting, you can start the call with the second PC. When you call to other user, the browser will show the dialog box to turn on your mic/camera. Please turn it on.
Conclusion
Integrating for Skype for Business into applications will come at no extra cost if your company is licensed for Skype for Business Server or Skype for Business Online. Make sure the browser supports WebRTC to ensure it runs Skype Web SDK seamlessly.
Every great team works through a timely, prompt and accurate communication process. Skype For Business makes that possible among teams spread across boundaries. Each step detailed above will bring you success in using the application, Skype for Business Online. Make sure you have the prerequisites before you begin the process.
Looking to integrate Skype for Business into your application? Let us assist you!